You may have heard of the concept of Backwards Design before. Often associated with Grant Wiggins, the concept basically states ‘Work out what you want your students to know, then design your lessons with that end in mind.’ Pretty simple, and self explanatory. But the question I had on my recent placement was ‘How can I do this practically, and how can I effectively guide students through the learning process and offer useful feedback along the way?’
My ‘design brief’ (as specified by the Maths department) was to use the year 9 Australian Curriculum mathematics textbook and, over 4 weeks, cover all of the content in the chapter on Linear Equations and Algebra. But I was keen to make this more explicit for students.
Backwards Design
I had been inspired by Sarah Hagan’s work on ‘I Can’ sheets so wanted to tie in these ‘I Can’ sheets with the idea of backwards design.
I surveyed the chapter, looking for a good way to organise this information, and I found that each of the worked examples was teaching a unique competency (or an important but incremental advancement of a pre-taught competency), and they were well labelled. Here’s an example: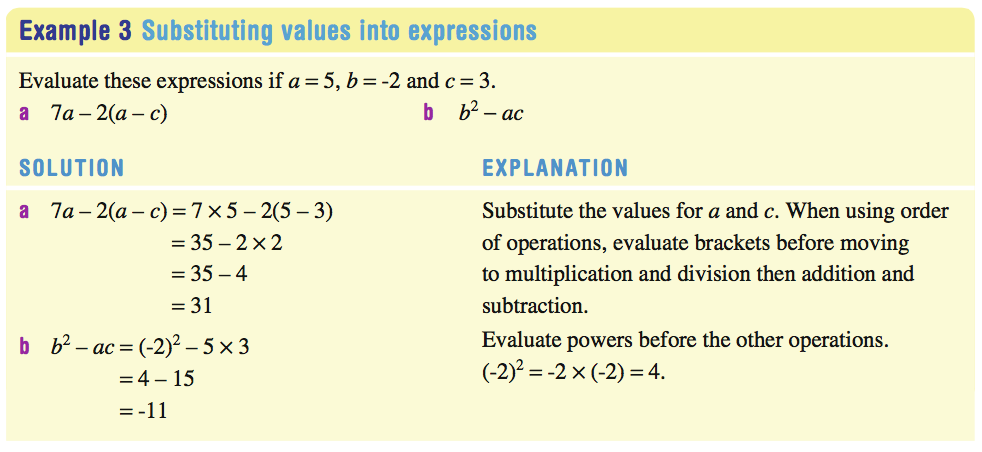
(Source, textbook)
So I took these competencies and constructed an ‘I can’ sheet that I distributed to students on day 1 of my placement. The ‘I can’ sentence from the above example was ‘I can substitute values into expressions and evaluate’.
In the above ‘I can’ sheet the ‘My pg.’ column was designed as a place for students to write the page number in their book that corresponds to that ‘I can’ statement. For example, if they stuck these two sheets into their book and began numbering straight after these two sheets then the first lesson, covering example 1 (E1) would be on page 1, so they would write a ‘1’ in the My pg. column. The space ‘Key points’ was for the students to write their own key points at the end of every lesson. The Tinycc link took students to videos of the content that I made (I hope to upload these videos to youtube in the near future).
So that was the backwards design, now it was time to tie it into assessment.
I put together a pre-test for the unit. This pre-test assessed students from E1 to E11, inclusive*. And each of the questions was numbered to do so (as can be seen below). This test was administered by my mentor prior to my actual placement and I was able to pick the tests up and mark them to get an idea of where each of the students was at even before I entered my teaching role. I didn’t return these tests to students and told them explicitly ‘The pre-test was about me working out where you guys are at the moment and helps me identify misconceptions so I can directly address them when I introduce the content. Your mark doesn’t matter, what matters is what the test told me about how each of you are currently thinking about this maths’.
Now, the goal of the backwards design was to show students where we were going in terms of content, and give them a clear roadmap of the stops along the way. The goal of assessment was to help me (pre-test) and them (mid-unit test) to see how they were tracking along this path.
My placement was 4 weeks long and at the 2 week mark students were given a mid-unit test. Little did they know that this mid-unit test was EXACTLY THE SAME as the pre-unit test! (one of the benefits of not returning their pre-test ; ) so it gave me a perfect picture of how each of them had progressed.
But, as mentioned, I was very keen to help the students become evaluators of their own learning. To do this, I got them to self-mark. Here’s the process…
Criterion Referencing and Self Marking
I printed out the mid-unit tests (which I referred to as the ‘mid-unit checkup’) double sided on an A4 sheet (one sheet). What this allowed me to do was give students the sheets then collect them up and run them as a batch through the photocopier, giving me both their original and a photocopied version. I then marked the photocopied version so that I had the marks myself and, in the following lesson, I handed back the unmarked original to students, stapled together to two other sheets.
The first sheet stapled behind the original mid-unit test was a set of clearly worked solutions, the second sheet was the following…
For each of the students I filled out the ‘Based on pre-test’ column with either a tick, arrow, or cross (feel free to read instructions on the above sheet so that this makes sense), I then encouraged students to fill out the ‘Based on mid-unit check’ column in the same fashion.
This did a couple of things. Firstly, it enable students to link the competencies to questions, reinforcing what metalanguage such as ‘common factors’ and ‘collecting like terms’ meant. Secondly, it showed them the areas that they still needed to work on. Equally importantly, it showed students how they had progressed, they were able to say things like ‘Great, on the pre-test I couldn’t simply by by collecting like terms, but now I can!’, this was a real plus.
The thing that I really appreciated was the ability to generate a graph of class average results from the pre and mid-unit tests. I then showed this to the class.
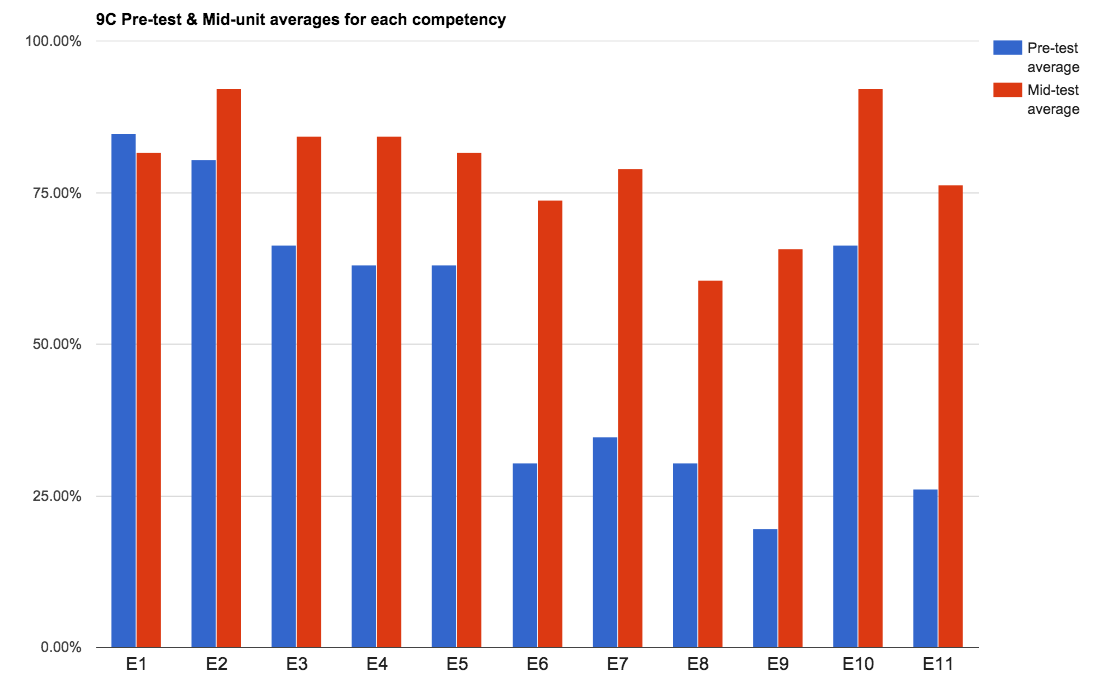
This graph really excited students. Students were able to celebrate the progress that they had collectively made, and to identify what they still needed to work on. Students even noticed that for E1, which was ‘write algebraic expressions for word problems’ the class had actually gone backwards! This prompted conversation and allowed us to talk about how this was the first thing we covered in the unit, and provided an opportunity to to re-visit the concept of the forgetting curve that I’d introduced them to earlier.
Reflections
I was really happy with how this approach came off. I saw marked increases in engagement from students. Most importantly, they totally ‘got it’. Student feedback alluded to the fact that students gained a greater understanding of where they were, and what they needed to work on. Here is what some of the students had to say about it (from a feedback form that I handed out on my final day of placement).
Next Time…
Next time I would like to improve upon this method by keeping the students’ ‘I Can…’ sheets all in one place, and preferably in a digital form, so that they can’t get lost and both students and I can access them from home, I’m thinking google spreadsheets for this but I’ll continue to consider options. This would allow them to take greater charge and track their own progress through the formative, mid-unit, and summative assessments.
I’m happy with how this approach went and I look forward to refining this approach when I’m next in the classroom.
The image below shows the class distribution of score in the pre-and post tests. I calculated my ‘effect size’ based on this information and was very pleased with the result : )

*I now think that it would be worth considering giving students a pre-test that contained ALL of the content from the unit (i.e., Example 1 to Example 21). This is because 1: It would have given them a better idea of the answer to the question ‘where are we going’, 2: it would have given some of the students opportunities to problem solve and try to work out for themselves how to do it and 3: I recently attended a lecture by Patrick Griffin in which he talked about how students shouldn’t EVER be getting 100% on tests because that doesn’t actually give you accurate information on where they are up to, it only tells you what level of achievement they are can perform higher than! Some students did get very close to 100% on this pre-test. But it is important to acknowledge that for these students I hadn’t had the time to build the culture of ‘have a go’ so some were even reluctant to attempt the pre-test, not quite understanding why they should be tested on something they haven’t even been taught yet. Making the pre-test longer and harder by including all content from the unit to be taught could have been overwhelming for some students.